 The Wisdom of Simplicity
If you have been intrigued by the prospect of growing your own mushrooms, perhaps after a bit of research you became daunted by the complexity and potential expense of “sterile techniques,” “clean rooms,” “laminar flow hoods” and “agar media.”
Or perhaps you are the more adventurous type. You plunged ahead with valiant attempts to isolate pure mycelial cultures, only to discover your beautiful white mycelium bursting into a rainbow of brilliantly colored fuzzy mold spores or sleek, shiny pools of bacterial contaminants. Take heart, you are not alone!
As chairman of the Cultivation Committee for the I have talked with many aspiring cultivators, and those are two of the most common roadblocks preventing progress in mushroom cultivation.
Recognizing the need to help overcome these challenges, the MSSF cultivation committee has periodically offered classes and workshops on how to grow mushrooms. I’m indebted to past teachers of these workshops — Sal Billeci, Dr. Joe Mandell, Fred Stevens and Don Simoni — for some of the methods I’m presenting here.
Goals and Objectives
The ultimate goal, of course is to start with one mushroom fruitbody and turn it into a bunch of fruitbodies. There are two mechanisms by which mushrooms can reproduce — by spores (similar to the seeds of plants) or by propagation of tissue extracted from a fruitbody (similar to plant propagation through cuttings). To get started we will use the latter technique, which is simpler and which offers a better chance of success for the beginning cultivator.
The objectives are:
- Start with a sterile piece of mushroom tissue and transfer it onto a nutrient medium (actually to a series of media in phases, which you will see as you read on),
- Create multiple copies of the culture,
- Avoid contamination of the culture,
- And, finally, create an environment in which the fungal organism is induced to fruit.
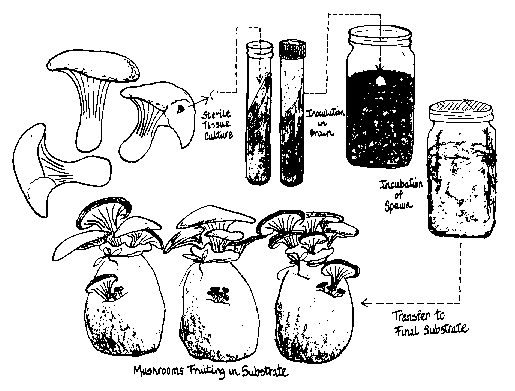
There are three distinct phases (see Figure 1) through which your culture will pass:
- Sterile culture on an agar medium
- Sterile culture on grain, also known as “grain spawn”
- Fruiting on a pasteurized substrate
Now don’t let the word “sterile” and a bit of terminology deter you. Yes, potential “contaminants” exist everywhere in the environment, in our homes, and even in clean rooms and laboratories. The objective is to prevent them from entering our cultures and competing for the “food” we intend for the sole use of our mushroom cultures. With a modicum of care and a little practice using some simple techniques, this process can be successfully mastered by anyone. So take a deep breath, and read on for the step-by-step details.
|
Phase I: Agar preparation and sterile culture
|
Agar Preparation: The first step is to prepare the agar media. Derived from a seaweed, agar plus added ingredients is often used to start and isolate cultures. Microbiologists tailor agar media to selectively grow fungi by adding various nutrients, e.g. minerals, antibiotics, etc. Agar media also has the advantage that contaminants are usually detected easily on the media surface, and thus can be eliminated early in the growing process.
Many types of agar can be used to grow fungal mycelium. Two of the more common are Potato Dextrose Agar (PDA) and Malt Dextrose Agar (MDA). Premixed commercial preparations are available from a number of sources. Although these may be considered relatively expensive compared with preparing the agar “from scratch,” if one has more money than time, they are a good choice.
For the do-it-yourselfer, two methods of preparation for PDA are given below. The first is a method I have used with success; it is based on that described in The Mushroom Cultivator, by Paul Stamets and J.S. Chilton. The second is a method successfully taught and used by the MSSF cultivation group. Try one or the other, or both, on for size. You will soon either adopt one that suits you well, or you will more likely incorporate some of these jewels of wisdom into your own method, which will undoubtedly evolve over time. The procedures are similar to making a recipe from a cookbook.
Materials Needed for both methods
- Rolled cotton (available at pharmacies)
- Aluminum foil
- Test tubes with autoclavable screw-caps — get from a medical or biological supply company, or scrounge. Labs sometimes discard these tubes in vast quantities. Call around.
- A small funnel for pouring the tubes
- Measuring cups
- A pressure cooker
- Two 1-liter small mouth bottles or pouring flasks
First, a note on the pressure cooker. This is probably the most expensive essential item for the home cultivator. If you already own one, and it is of sufficient size to contain the bottles or jars you wish to use, you are all set. If not, a new cooker may cost somewhere between $75 – $250, depending on size and where it is purchased. They may be found at most hardware stores.
It is also possible to start out frugally if you are on a limited budget by searching at thrift stores, garage and rummage sales, and flea markets. Good quality pressure cookers may often be found for $15 – 35. Be sure to get the type with a pressure gauge, rather than the type with weight only and no gauge. In any event, always read and carefully follow the manufacturer’s safety instructions for the cooker you choose.
PDA Method No. 1
(Makes about 1 liter of media)
Materials Needed:
- 300 grams potatoes
- 20 grams agar (from biological supply, health food store or Asian food market)
- 10 grams dextrose or other sugar
- 2 grams brewers yeast (optional)
Boil potatoes in 1 liter of water for 1 hour. Drain the potatoes, reserving the liquid. Mash the potatoes, apply butter, salt and pepper, and eat. Sour cream, chives and other amendments are optional.
Once your appetite for mashed potatoes has been satisfied, place the potato broth with the agar, sugar and optionally the yeast in a bowl and mix thoroughly (a wire whisk works well, but stir, do not beat).
Pour half of the mixture into each bottle or flask. Fill to only 1/2 to 3/4 of the vessel’s capacity. Plug the mouths of the bottles or flasks with cotton and cover with aluminum foil. Put about 1/2 inch water in the bottom of the cooker and insert its rack and then the bottles or flasks. Place the cover on the cooker and lock it in place. Turn on the heat until steam is venting from the cooker. Allow to vent for a few minutes before closing the stopper or applying the weight.
Cook the vessels at 15 psi (250 degrees F.) for 15 minutes. Do not allow the temperature to exceed 250 degrees F. for any length of time as that will caramelize the media and ruin it.
After the 15 minutes, turn off the heat and allow the pressure to return to normal gradually (about 45 minutes). Meanwhile, remove the caps from the tubes, place the tubes in clean tin cans or test tube racks, and place cans or racks of tubes and caps on a clean work surface in a dust-free location. Once the media vessels can be handled with a clean towel or oven mitt, remove them from the cooker to the location with the tubes. Swish the media around a bit to mix it thoroughly and remove the foil and cotton. Fill the tubes to about 1/3 their capacity, using the funnel.
Place the caps loosely on the tubes, place the cans of tubes in the pressure cooker (replacing used water in the bottom of the cooker, if needed), bring back to 15 psi (250 degrees F.) and cook for 30 minutes. Again let the cooker cool gradually until the pressure is back to normal.
Remove the cans of tubes and tighten the caps. Anchor or otherwise support the cans such that they are tilted at an angle and the agar media surface is “slanted” in the tubes, offering the maximum amount of surface area on the media for future mycelial growth. (Tubes prepared in this manner are often referred to as “slants.”)
As the media cools, it will harden into a gel, and eventually the cans can be returned to their vertical position and the media will remain in place. If tubes will not be used immediately, they may be stored in Ziploc bags in the refrigerator for weeks to months. If stored, be sure to check for mold or bacterial contamination before use.
PDA Method No. 2
(makes about one quart of medium)
Materials Needed:
- 10 ounces or 284 grams potatoes
- 3/4 ounce or 21.3 grams agar
- 1/4 ounce or 8 grams dextrose — table sugar may be substituted
Step 1: Mixing the ingredients
- Wash the potatoes but don’t peel. Slice into small pieces.
- Cook potatoes until tender, in about a pint of water.
- Strain and save the liquid. Discard the potatoes or save to eat later.
- Mix the dextrose/sugar, potato broth and agar in a metal or Pyrex¿ bowl. Add water bringing the volume to one quart.
Step 2: Liquefying the Agar
- Place the agar mixture in a pressure cooker. Cover the bowl with a sheet of aluminum foil.
- Bring the pressure up to 15 psi. Cooking 20 minutes will liquefy the agar mixture.
- Let the pressure cooker cool slowly.
Step 3: Pouring agar into test tubes
- With an oven mitt and measuring cup, fill each test tube about 1/3 full. Tin cans can be used in place of test tube racks. Excess agar may be stored in a bottle, closed with a cotton or polyester fiber plug and sterilized later along with the test tubes. If test tubes are not available, small bottles can be used instead.
- If the test tubes have plastic caps, the caps should be loose so that pressure can equalize during sterilization. Cotton or polyester plugs avoid this problem but require an aluminum foil cover to prevent wetness from condensation when the pressure cooker cools.
Step 4: Sterilizing the Agar
- Place the test tubes/bottles containing the agar in a pressure cooker and sterilize at 15 psi for 25 minutes. Do not count the time needed to bring the pressure cooker up to 15 psi.
- Let the pressure cooker cool slowly. Sudden release of pressure will cause the agar in the tubes to boil violently, splattering the caps and plugs and creating a potential for contamination.
Step 5: Slanting the test tubes
- Wipe down with water or a 10% bleach solution the area where the test tubes are to be slanted. Work in a draft-free room.
- With an oven mitt, slant the still hot tubes against a raised surface. Experiment beforehand with strips of wood or magazines to establish the correct angle.
- After the agar has jelled, tighten the caps. Store the finished tubes/bottles in a cool, dust free area. A cover of aluminum foil will help to prevent contamination before the tubes are used.
Sterile Culture Technique
Once the agar tubes have cooled, it is time to use them to start mushroom cultures.
Materials needed:
- A scalpel or very sharp thin-bladed knife
- An alcohol lamp or propane torch with fuel and lighting device or matches
- Tin can(s) or test tube racks containing the “slants” and one extra can or rack for storing completed tubes
- Scalpel or knife rest (see below for examples of homemade varieties)
- Micro-porous tape (such as first aid tape from the pharmacy or medical supply) or masking tape (a lower-cost option)
- Spray bottle containing 10% chlorine bleach, 90% water solution (optional)
- Fresh, clean mushroom fruitbody or bodies (Oyster mushrooms are highly recommended for beginning cultivators)
Select a location in your home, office or lab which is as free as possible from dust and molds. Work on a sturdy table or bench after cleaning the surface with warm, soapy water and wiping dry. (You may also spray the area with the 10% bleach solution for extra protection and wipe with a clean cloth or paper towel.) Have all windows closed and minimize air circulation. (Ideally, try to carry out your cultivation activities first thing in the morning before particulates are kicked up by household activities.)
Have all materials ready and within easy reach. Place the culture tubes in the tin can(s) or racks. Light the lamp or torch. Sterilize the scalpel blade thoroughly in the flame, then place it on the stand. The stand can be fashioned from a wire coat hanger, a tin can, or from other appropriate household material. The object is to have a stable place to rest the handle such that the blade is suspended in the air near the flame to avoid contamination when not in use.
Start with a fresh, clean mushroom fruitbody. Although the outer surfaces of the fruitbody may harbor bacteria and mold spores, the internal tissue usually is free from contaminating organisms, assuming the mushroom is not waterlogged.
Tear or break off a section of the mushroom (do not cut with a knife, as the blade will introduce contaminants from the outer surface). Place the mushroom on the table with the clean surface facing sideways (not touching the tabletop). The object is to have one clean, exposed surface from which a very small piece of tissue may be extracted, and to keep that piece as pristine as possible while removing it to the culture tube.
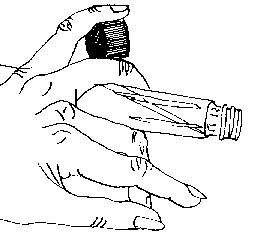
Now you must organize your materials so that when the tube is opened, it is exposed for a minimal amount of time while you insert the piece of tissue. To decrease the probability of contamination, neither the tube nor the cap are allowed to rest on the table. This part is just a bit tricky. It is a good idea to practice the technique a few times with an empty tube before using real agar tubes and a mushroom. (The following assumes you are right-handed. Reverse directions if you’re not.)
Position your left hand with thumb facing downward and fingers facing forward horizontally. Place the tube in your left hand between middle and ring finger, placing the ring finger on top of the tube and the middle finger underneath it, with the tube cap facing toward the inward direction. Always keep the tube positioned horizontally so particulates from the air cannot fall into the mouth of the tube. The slanted agar surface, on which you will place the mushroom tissue, should be facing upward. Carefully remove the cap from the tube and place it between the ring and pinkie fingers, sideways, with the pinkie on the top and the ring finger underneath. (See Figure 2).
 |
|
Fig. 2 — A little tricky, but practice helps
|
Using the remaining index finger and thumb of the left hand, firmly grasp a piece of the mushroom with the clean surface facing upward or sideways. With the right hand, grasp the scalpel firmly by the handle as you would hold a pen or pencil. Starting with the tip of the scalpel, cut a very small triangular shape from the clean inner tissue. Gently “tease” the tissue free and quickly place it just inside the lip of the tube. If necessary, tap the scalpel to free the tissue. Return the scalpel to its holder, and quickly replace the cap.
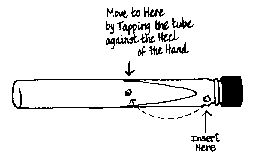
Now tap the bottom of the tube a few times on the heel of your hand to position the mushroom tissue on the surface of the agar (See Figure 3.) Place the tube in a second storage can.
 |
|
Fig. 3 — Move by tapping
|
Voila! There is a very good chance you now have a pure tissue culture.
Repeat these steps for the remaining tubes and mushroom material. It is important to make several tubes from each mushroom specimen, since even with the most careful technique contamination can sometimes occur.
Between each tube inoculation, re-sterilize the scalpel or knife blade in the flame, and tear off a fresh piece of the mushroom exposing yet another clean tissue surface.
When finished with all of the tubes, tighten the caps, and tape each on the area where the tube meets the cap with micro-porous tape. Micro-porous tape allows the culture to “breathe” but prevents contaminants from entering the tube. Label the tubes with the date and contents using a permanent marker such as a Sharpie™ or use a small mailing label.
Finally, place the newly inoculated tubes in a low light location with moderate temperature (55 – 70 degrees F. is fine). In a few days to a week, the inoculated tissue will become “fuzzy” as the mycelium begins to grow. After several weeks, mycelium will completely cover the agar surface.
If you see mold (usually detected by its green, black or other colored spores) or bacteria (usually colored slimy material), you should discard the culture immediately and clean the tube and cap thoroughly with hot, soapy water. If possible, empty the contaminated tube in a location as far away from your other cultures as possible. For example, carry it straight outdoors to the garbage can. You may use a chopstick or other long thin tool to loosen the media; it should then slide out in one or a number of pieces.
Phase II: Sterile Transfer Techniques and Grain Spawn
Sterile transfer to multiply agar tubes
Your agar tube containing mushroom mycelium is your “master culture.” If you want to replicate the culture to increase your supply or to share with other cultivators, you should transfer the material from one tube into many tubes. This may be accomplished using the same process as during the initial sterile transfer described above.
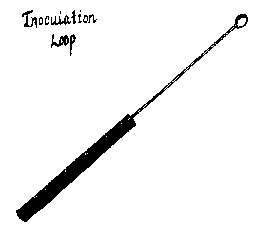
Instead of using a piece of tissue from a fruitbody, however, substitute a tiny piece of agar containing mycelium from the master tube. The transfer is made using a scalpel or another appropriate tool such as an inoculation loop, which can be purchased or easily made using a piece of thin wire attached to some sort of handle. (See Figure 4.)
 |
|
Fig. 4 — A simple tool
|
Again, be sure to sterilize the tool between each inoculation and minimize the amount of time the cap is off each tube. With a little practice, these transfers can be made quickly and with excellent success.
Sterile transfer to grain to create spawn
The next step in the cultivation process is to increase culture size by growing it on grain, often known as “grain spawn.” Mushroom cultures grown on grain are easily proliferated by shaking and, as you will see, easily transferred by pouring from one container to another. As an example, one bottle of grain spawn can be used to inoculate many gallons of the final substrate. Grain is fairly inexpensive and readily available at health and animal feed stores.
It is readily colonized by many saprophytes, including Pleurotus species (Oyster mushrooms) and Agaricus species (button mushrooms and their relatives).
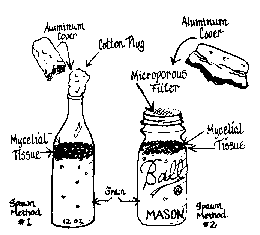
Here are two equally viable methods. The first uses 12 or 28 oz. beer, water or soft drink bottles and wheat, although rye can be substituted. The second uses canning jars and wild bird seed. Although wheat, rye or bird seed can be used with either type of container, the two methods produce slightly different results. Experiment to see which works best for you.
The primary advantage of the bottles is that the opening is smaller, thus decreasing the chance of contamination during inoculation. That advantage can later be a disadvantage: It can be more difficult to remove the material from the bottles.
If you have, or later obtain, a laminar flow hood with a HEPA filter which minimizes contamination problems, canning jars are recommended because they are easier to work with. If you are careful, however, you can have good success using either technique, even without the hood. (See Figure 5.)
 |
|
Fig. 5 — Two ways to create spawn
|
Materials needed for both methods:
- A pressure cooker large enough to contain the bottles or jars
- Aluminum foil
- Grain (wheat, rye, millet or sorghum) or wild bird seed
Preparing Grain, Method No. 1
Materials Needed
- Clear 12 oz. or 28 oz. beer, water or soft drink bottles
- Rolled cotton or cotton or polyester fiberfill such as pillow stuffing
- Grain (wheat, rye, millet or sorghum) or wild bird seedRecipe for 12 oz. bottle:
- 1/3 level cup wheat or other grain
- 1/4 cup waterRecipe for 28 oz bottle:
- 1 level cup wheat
- 2/3 cup water
Guidelines for grain and bottles
An important consideration when preparing grain is that it will roughly double in volume when cooked or sterilized. A rule of thumb is to fill a container only one third full with dry grain. If using bottles, a breathable plug closure can be fashioned from rolled cotton (available at pharmacies) or polyester/fiberfill material (at fabric stores).
Cooking/Sterilizing
Grain can be cooked/sterilized in either one or two steps. The two step process produces a very uniform product, but if time is limited, cooking and sterilizing can be done simultaneously.
Two Step Process
After the bottles are loaded with grain and water, place them in the pressure cooker and cover with a sheet of aluminum foil. The foil will help to prevent the filter plugs from getting wet from condensate. Cook the grain in the pressure cooker by bringing the pressure up to 15 psi for seven minutes. Let the pressure cooker cool and use oven mitts to shake the hot bottles so that wet and dry grain is mixed. Place the containers back in the pressure cooker and sterilize by cooking at 15 psi for 45 minutes. Do not count the time required to bring the pressure cooker up to pressure. Then let the pressure cooker cool slowly.
Remove the bottles and shake once again to mix the grain. Cover the filter plugs with a paper dust shield. The will help prevent contamination. Store the bottles in a dust-free box or cabinet. Since the grain will gradually dry out over time, avoid making cultures too far in advance of your needs.
One step process
Proceed as above, but simply cook for 45 minutes at 15 psi. After the pressure cooker has cooled, but while the bottles are still hot, use oven mitts to shake the bottles to mix wet and relatively dry grain.
Well-prepared grain is plump and shakes readily with a soft “ring.” Overcooked grain prepared with too much water will often rupture. Then the starchy contents cause clumping, making it difficult to shake. Grain prepared with too little water will be flinty, shriveled and unsuitable for mycelial growth.
Spawn Method No. 2
Materials needed:
- Pint or quart sized canning jars
- Micro-porous filters fitting inside canning jar lid ring (Mycological supply or homemade)
- Aluminum foil
- Paint strainer bags (from hardware or paint store)
Grain preparation
Measure one jar of grain for every three jars you will prepare into a paint strainer bag until the bag is half full. Use more bags as needed, keeping in mind that you can only cook as many jars at once as you have room for in the available pressure cooker(s). Tie the bag closed with twine, place in a large pot or the pressure cooker bottom (setting the lid aside), fill with water until just covering the grain, and boil for 30 minutes. Remove into the sink and rinse for a few minutes in cool water. This will remove some of the released starch so the grain will not stick together as readily.
Let drain for a few minutes. While draining, insert the canning jar lid filters into the lid rings. The filters may be obtained commercially (see sources at the end of this article), or may be cut out of appropriate fabric, such as a stiff, heavy polyester to fit the lid ring. Instead of using a filter, you may invert the disk that comes with the lid to provide for a small amount of air exchange, but the filtering capability of this method is questionable and a greater possibility of contamination may result. In the long-run, the commercially available filters or handmade filters are re-usable and probably worth the investment.
Cooking/Sterilizing
Untie the bag and fill the jars with grain. The jars should be 1/2 to 2/3 full. Place the lids with filters on the jars and seal loosely. Pressure cookers generally have some sort of rack to hold the jars away from the bottom of the cooker. Add water to the cooker so that it almost reaches the bottom of the jars when they are placed on the rack. (There should be at least a couple inches of water.)
Load the pressure cooker with the jars. Please see the manufacturer’s instructions for the pressure cooker and observe all safety guidelines. Bring the cooker up to 15 psi (250 degrees F.) and maintain that pressure/temperature for 2-1/2 hours. Turn off heat and let cool for 30 minutes. Carefully remove jars from cooker, using a clean potholder or oven mitt if the jars are still too hot to handle. Tighten the lids and cover with a small square of aluminum foil. Shake the jars vigorously to ensure that the grain is not sticking or clumping. Store in a clean, dust free location until ready to use.
Grain Amenities
For some mushrooms, the acidity of the media, as measured by Ph, can influence growth. Acidity can be adjusted by adding 1 tbsp of ground limestone (CaCO3) to a gallon of water and using the latter to mix with the grain. Limestone may be purchased at a garden supply store (it’s sometimes called “agricultural lime”). Agaricus bisporous(the button or Portobello mushroom) is an example of a species that benefits from adding CaCO3 to the grain. For more information on the requirements of various species, consult a cultivation guide such as Paul Stamets’ The Mushroom Cultivator (see “Sources” at the end of this article).
Transfer of agar culture to grain bottle or jar
One agar culture tube will inoculate several spawn bottles or jars, since only a tiny piece of mycelium is required for each jar. Generally you will follow the same sterile technique described for Phase 1. Again, have all of your materials and equipment in place before you begin, and practice the technique with empty jars and tubes until you are comfortable and can work quickly.
When working with grain bottles or jars it is helpful to have a cradle to hold the bottle or jar in a horizontal position while making transfers. This frees the hands for removing and replacing lids. A cradle can easily be fashioned from a quart or half-gallon milk carton by cutting appropriate-sized notches in it.
After you’ve removed the cap and lid of the agar tube and of the bottle or jar, use your inoculation loop (Figure 4) to cut a small piece of mycelium from the agar. Place it just inside the jar and close both lids. Lastly, tap the jar against the heel of the hand until the mycelium is positioned on the grain.
Be sure to sterilize your inoculation loop in the flame between each inoculation, and to keep both tube and jar in a horizontal position at all times to prevent airborne particulates from entering.
Once the jars have been inoculated, date and label their contents using a permanent marker, such as a Sharpie, or use a small paper mailing label. You may also want to mark an arrow on the container closest to where the mycelium has been placed in the jar for further monitoring, as sometimes it is difficult to see until it begins to grow. As the mycelium begins to grow through the grain, periodically shake the container to speed colonization and to prevent the grain from clumping into a thick mass. The mycelium of mushrooms like Oysters and Agaricus grows well at room temperature. Once a grain culture is fully colonized, it can be stored in a refrigerator to maintain its viability.
Phase III: Final Substrate and Induction of Fruiting
In the third and final phase of mushroom cultivation, culture size is increased again, but usually on a different substrate than grain, and environmental conditions are manipulated to stimulate fruiting. The choice of a fruiting substrate will vary, depending on the mushroom species. Here we will describe the substrate and conditions necessary to fruit Pleurotus species (Oyster mushrooms).
Oyster mushrooms are an excellent choice for the beginning cultivator as the mycelium grows quickly, competes aggressively with undesirable organisms, and fruits readily under a relatively wide range of conditions. Also, there are numerous varieties available in a rainbow of colors including white, brown, pink and yellow, and they are available from food stores or via mail order suppliers.
Fruiting Substrates
Oyster mushrooms can be fruited on a variety of materials, e.g. hardwood logs, straw, sawdust, corncobs, shredded newspaper, etc. Avoid sawdust and chips from softwood trees such as pine, as these inhibit the growth of Oyster mushroom mycelium. Substrate for growing Oyster mushrooms can be obtained from pet stores and feed stores where you can buy bales of straw or bedding material like aspen shavings. Lumberyards that saw hardwoods and tree-trimming companies are also good sources of growing material. Use your observation skills and creativity.
Preparing the substrate
Oyster mushrooms can be grown on a pasteurized substrate, which is easier to prepare and less expensive than sterile media. The purpose of pasteurization is to leach out soluble compounds that might attract competing molds, and to kill insect pests. A simple method for preparing pasteurized chopped straw or similar material is to soak it in steaming water for about 30 minutes, then drain and cool it. The moisture content will be about right when a squeezed handful just barely produces droplets of water between the fingers.
For larger quantities of substrate, or for logs, a 55-gallon metal barrel or drum may be placed on an outdoor type propane stove or burner. Filled with substrate and covered with water, it is brought to a boil and boiled for 30 or 45 minutes. The material is then strained (a homemade strainer is fitted inside the barrel before filling, made from wire mesh secured from a hardware store). Alternatively, fill paint strainer bags 1/2 full with the substrate, tie with twine, fill the barrel 1/2 or 3/4 full with these, add water and boil as described above.
Culture Size and containers
Fruiting cultures can be of any size, but hobbyists would be wise to start small in order to perfect their technique. A half gallon milk carton lined with a plastic bag is a convenient hobby-sized culture. Another alternative is to purchase sleeves of clear plastic food containers and lids from a restaurant supply store. These are inexpensive, sturdy, easy to transport, and offer good viewing of the culture’s progress.
Enriching the substrate
Yields can be improved by adding rich food sources like coffee grounds, cotton meal, rice bran, etc. However, these should be used with caution since they increase the likelihood of contamination. Typically these materials are added after initial spawn run, i.e. after the culture has already been fully colonized, to avoid contamination. Try using a chopstick to make small tunnels in the colonized mycelium from the top, then pour in the pasteurized additive, possibly using a funnel. This will help the mycelium to colonize it quickly, minimizing the opportunity for contaminants to get to it first.
Spawning
The more grain spawn used to inoculate a fruiting culture the faster it will be colonized, the less likely it will become contaminated, and the sooner it will fruit. Because pasteurized cultures can become contaminated with molds and bacteria, it’s best to err on the side of excess spawn when inoculating your first cultures. A spawning rate of one cup of inoculum to a half gallon of substrate works well.
Shake the grain bottle or jar well before opening. Pour the grain spawn across the surface of the substrate or, with clean hands, mix the substrate and spawn together in a tray and then place in a bag or container. Tie the plastic bag loosely with a twist-tie, or simply fold over. With plastic lids, poke small holes after a few days to allow air exchange. Store in a dust-free location, possibly laying some paper or plastic loosely across the top to prevent dust and contaminants from entering.
Most strains of Oyster mushroom, especially those used commercially, grow quickly between 65 and 75 degrees F. and don’t require a lowering of temperature to fruit. During spawn run, cultures should be maintained in a high humidity environment with low levels of air exchange. Oyster mushroom mycelium can endure fairly high levels of CO2. A culture the size of a half gallon milk carton should be fully colonized in about three weeks when grown at 70 – 75 degrees F.
Fruiting
A culture normally will not fruit until the substrate has been fully colonized. Small aggregations or coralloid growths on the surface indicate that a culture is beginning to fruit. Although lowering the growing temperature is usually not required for fruiting, a small amount of indirect light is believed to be important.
For normal-shaped fruitingbodies, more air exchange is required than during spawn run, but high humidity must still be maintained. To achieve this condition, cultures are often kept in a plastic bag with holes for aeration or in a box or terrarium with a moistened tray of gravel. If using container and lid, once the mushrooms begin to “pin” (i.e., begin to form tiny masses resembling miniature fruitbodies), the lid may be removed, and then the aforementioned plastic bag with holes or a terrarium may be used to maintain humidity.
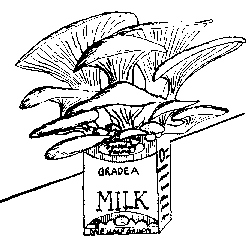
It can take as long as a week for an Oyster mushroom to grow from a pinhead to maturity depending on temperature and humidity. When the cap margin starts to turn up, the fruitingbody is past its prime, so by this point you ought to have either used it to start another series of culture, or to have eaten it for supper. (See Figure 6.)
 |
|
Fig. 6 — Successful Fruiting
|
Where Do We Go From Here
Once you have become comfortable with the techniques and have had success with an easy-to-grow variety such as the Oyster mushroom, you may be inspired to try another species. Or perhaps your loved ones will have implored you to designate a “special” location in your home for your growing collection of fruiting mushrooms, cultures and associated paraphernalia. Perhaps you’d like to further your campaign against contaminants by investing in a laminar flow hood, or even building a lab, perhaps in an unused room or close